Here I will explain how to install the android operating system, there are several steps to install the android, I will explain one by one from each tahapanya as follows:
STAGE 1. PREPARING FOR YOUR DEVICE
At this stage you must prepare the device to be installed before the start of the Android SDK, and make sure that your hardware meets the System Requirements. In addition there are also devices that need to be there to prepare supporting the Java Platform (JDK) that also you need to install, but if it already exists in your device this is not in need anymore. If you are going to develop with the help of the IDE Eclipse + Android Development Tools (ADT) Plugin, make sure you have the Eclipse IDE with the appropriate version and support the Android SDK (version 3.4 or better recommended). If you need to install Eclipse, you can download it at:
STAGE 2. DOWNLOAD ANDROID SDK STARTER PACKAGE
Once you have completed the first stage in the settings to your environment to develop applications for Android and then proceed by downloading the Android SDK starter package. Starter package does not provide for application development as a whole, but only as a base / core of the SDK that you can use to download other components of the SDK. Make sure the download package (package) that match your device OS.
If you downloaded a. Zip or. Tgz package (instead of the SDK installer), unpack it to a safe location on your machine. By default, the SDK files are unpacked into a directory named android-sdk-Once you have completed the first stage in the settings to your environment to develop applications for Android and then proceed by downloading the Android SDK starter package. Starter package does not provide for application development as a whole, but only as a base / core of the SDK that you can use to download other components of the SDK. Make sure the download package (package) that match your device OS.
If you downloaded the Windows installer (. Exe files), run it now and it Will check whether the proper Java SE Development Kit (JDK) is installed (installing it, if Necessary), then install the SDK Tools into a default location (which you can modify).
Make a note of the name and location of the SDK directory on your system-you Will need to refer to the SDK directory later, Pls setting up the ADT plugin and Pls using the SDK tools from the command line.

after that proceed with At Work with field enter: http://download.eclipse.org/releases/galileo
Then click Add
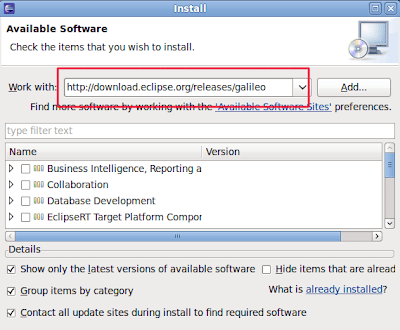
Then you will see some software that is available and ready to be installed.
Then, delete the field and replace with Work With https://dl-ssl.google.com/android/eclipse/
Click Add

Select all the entries corresponding to the image, then click Next
After the installation is complete, close your Eclipse, and then run back.
On the menubar select Windows -> Preferences. On the left choose Android.
Enter the path on your Android SDK Location field.
Click Apply and OK

after the above is completed then the process of setting process, to launch the Android project, on the menu bar select File -> New -> Projectlalu select Android Project on the Wizard.

if all the above has been running as they should then android development project can be run
hopefully useful information is still sketchy and when can you add to post comments below


{ 0 comments... read them below or add one }
Post a Comment