Showing posts with label Android. Show all posts

Android 2.0 Platform Official with Video

Posted by BBCyber on Monday, November 1, 2010

Android 2.0 brings a new developer API for synchronization, Bluetooth, and a few other things. Using a new synchronization, account manager and contact API, you can write applications to allow users to synchronize the device to a source of contact. You can also give users a faster way to communicate with others by embedding Contact Fast in your application. With the new Bluetooth API, you can now easily add peer-to-peer connectivity for your applications or games.

Developers can now use the Android SDK Manager to add their support to SDK 2.0 and SDK update tool for revision 3. New Developers can download the Android SDK from the download site. Once downloaded, the Android platform should be added using the SDK Manager

Manager SDK allows you to add a new platform for your Android SDK.

Android SDK Tools, revision 3 is needed to develop for Android 2.0. This includes support for the code via Ant build system, as well as Mac OS X 10.6 (Snow Leopard) support for the SDK and related tools. For those of you who develop using Eclipse, we released the 0.9.4 version of the ADT through regular Eclipse update mechanism.

This device will run the Android 1.5, 1.6, or 2.0. android also plans to update minor version of the Android 2.0 by the end of the year, and it will be the last update for 2009. Here are some things you can do to become better prepared:

Download Android 2.0 platform and make sure your existing applications continue to work on new devices running the Android 2.0.

Make sure that your application works when using a WVGA (800x480) & FWVGA (854x480) emulator skin. We expect the device to the type of screen, running Android 2.0 will be launched soon.

Checkout the video below for more information about Android 2.0.

More aboutAndroid 2.0 Platform Official with Video

How to Configuring the ADT Plugin

Posted by BBCyber on Wednesday, October 20, 2010

After you've successfully downloaded the ADT as described above, the next step is to modify your ADT preferences in Eclipse to point to the Android SDK directory:

Select Window > Preferences... to open the Preferences panel (Mac OS X: Eclipse > Preferences).
Select Android from the left panel.
You may see a dialog asking whether you want to send usage statistics to Google. If so, make your choice and click Proceed. You cannot continue with this procedure until you click Proceed.

For the SDK Location in the main panel, click Browse... and locate your downloaded SDK directory.
Click Apply, then OK.
Done! If you haven't encountered any problems, then the installation is complete. If you're installing the Android SDK for the first time, return to Installing the SDK to complete your setup.
More aboutHow to Configuring the ADT Plugin

How To Adding SDK Components

Posted by BBCyber on Friday, October 15, 2010

This time I will discuss how do I add and update the components in your Android SDK to quickly and easily. To add or update the SDK discussion of individual components that you need only use the Android SDK and AVD Manager (included in the SDK Tools).

It only takes a few steps to install the individual version of the Android platform, new development tools, the new document, and the SDK add-ons. The new SDK component is automatically installed into an existing directory the SDK, so you do not need to update your development environment to determine the location of the new SDK.

If you're preparing your Android SDK for the first time, see Installing the SDK for information about what components to install.

Note: If you are developing in Eclipse, you may also need to update the ADT plugin you when you update your development tool. See the revisions contained in the ADT Plugin for Eclipse document.

Android SDK and AVD Manager is the tool you use to install and upgrade the SDK components in your development environment.

How To Adding SDK Components

You can launch the Android SDK and AVD Manager at one of the following ways.

The launch of the Eclipse / ADT
If you are developing in Eclipse and have installed the ADT plugin, follow these steps to access the Android SDK and tools AVD Manager:
- open Eclipse
- Select Window> Android SDK and AVD Manager.

The launch of the SDK Manager script (Windows only)
For Windows only, SDK includes a script that calls the Android SDK and AVD Manager. To run the tool using the script, double click on the root directory of the SDK Manager.exe SDK.

Launched from the command line
In all the development environment, follow these steps to access the Android SDK and tools AVD Manager from command line:


- Navigate to the /tools/ directory.

- Execute the android tool command with no options.

$ android


Before you install SDK components, we recommend that you disable any antivirus software that may be running on your computer. There are cases in which antivirus software on Windows is known to interfere with the installation process, so we suggest you disable your antivirus until installation is complete.Follow these steps to install new SDK components in your environment:

Launch the Android SDK and AVD Manager as described in the section above.
Select Available Packages in the left panel. This will reveal all of the components that are currently available for download from the SDK repository.
Select the component(s) you'd like to install and click Install Selected. (If you aren't sure which packages to select, read Recommended Components.)
Verify and accept the components you want (ensure each one is selected with a green checkmark) and click Install. The components will now be installed into your existing Android SDK directories.
New platforms are automatically saved into the /platforms/ directory of your SDK; new add-ons are saved in the /add-ons/ directory; samples are saved in the /samples/android-/; and new documentation is saved in the existing /docs/ directory (old docs are replaced).


From time to time, new revisions of existing SDK components are released and made available to you through the SDK repository. In most cases, if you have those components installed in your environment, you will want to download the new revisions as soon as possible.

You can learn about the release of new revisions in two ways:

You can watch for updates listed in the "SDK" tab of the Android Developers site, in the "Downloadable SDK Components" section.
You can watch for updates listed in the Available Packages panel of the Android SDK and AVD Manager.
When you see that a new revision is available, you can use the Android SDK and AVD Manager to quickly download it to your environment. Follow the same procedure as given in Installing SDK Components, above. The new component is installed in place of the old, but without impacting your applications.

Tip: Use the "Display updates only" checkbox to show only the components you do not have.

In some cases, an SDK component may require a specific minimum revision of another component or SDK tool. Where such dependencies exist, they are documented in the revision notes for each component, available from the links in the "Downloadable SDK Components" section at left.

For example, there may be a dependency between the ADT Plugin for Eclipse and the SDK Tools component. When you install the SDK Tools component, you should also upgrade to the required version of ADT (if you are developing in Eclipse). In this case, the major version number for your ADT plugin should always match the revision number of your SDK Tools (for example, ADT 8.x requires SDK Tools r8).

Also make sure that, each time you install a new version of the Android platform, you have the latest version of the SDK Platform-tools component. The SDK Platform-tools contain tools that are backward compatible with all versions of the Android platform and are often updated to support new features in the latest version of the Android platform.

The development tools will notify you with debug warnings if there is dependency that you need to address. The SDK and AVD Manager also enforces dependencies by requiring that you download any components that are needed by those you have selected.

Available Packages displays components available from the Android Repository and Third party Add-ons. You can add other sites that host their own Android SDK add-ons, then download the SDK add-ons from those sites.

For example, a mobile carrier or device manufacturer might offer additional API libraries that are supported by their own Android-powered devices. In order to develop using their libraries, you must install their Android SDK add-on, if it's not already available under Third party Add-ons.

If a carrier or device manufacturer has hosted an SDK add-on repository file on their web site, follow these steps to add their site to the SDK and AVD Manager:

Select Available Packages in the left panel.
Click Add Add-on Site and enter the URL of the repository.xml file. Click OK.
Any SDK components available from the site will now be listed under a new item named User Add-ons.

If you are using the SDK and AVD Manager to download components and are encountering connection problems, try connecting over http, rather than https. To switch the protocol used by the SDK and AVD Manager, follow these steps:

With the Android SDK and AVD Manager window open, select "Settings" in the left pane.
On the right, in the "Misc" section, check the checkbox labeled "Force https://... sources to be fetched using http://..."
Click Save & Apply.
More aboutHow To Adding SDK Components

How to Installing the Android SDK

Posted by BBCyber on Sunday, October 10, 2010

Here I will explain how to install the android operating system, there are several steps to install the android, I will explain one by one from each tahapanya as follows:

STAGE 1. PREPARING FOR YOUR DEVICE
At this stage you must prepare the device to be installed before the start of the Android SDK, and make sure that your hardware meets the System Requirements. In addition there are also devices that need to be there to prepare supporting the Java Platform (JDK) that also you need to install, but if it already exists in your device this is not in need anymore. If you are going to develop with the help of the IDE Eclipse + Android Development Tools (ADT) Plugin, make sure you have the Eclipse IDE with the appropriate version and support the Android SDK (version 3.4 or better recommended). If you need to install Eclipse, you can download it at:

STAGE 2. DOWNLOAD ANDROID SDK STARTER PACKAGE
Once you have completed the first stage in the settings to your environment to develop applications for Android and then proceed by downloading the Android SDK starter package. Starter package does not provide for application development as a whole, but only as a base / core of the SDK that you can use to download other components of the SDK. Make sure the download package (package) that match your device OS.
If you downloaded a. Zip or. Tgz package (instead of the SDK installer), unpack it to a safe location on your machine. By default, the SDK files are unpacked into a directory named android-sdk-

If you downloaded the Windows installer (. Exe files), run it now and it Will check whether the proper Java SE Development Kit (JDK) is installed (installing it, if Necessary), then install the SDK Tools into a default location (which you can modify). 
Make a note of the name and location of the SDK directory on your system-you Will need to refer to the SDK directory later, Pls setting up the ADT plugin and Pls using the SDK tools from the command line. 

Stage 3. Installing the ADT Plugin for Eclipse 
Android offers a custom plugin for the Eclipse IDE, called Android Development Tools (ADT), that is designed to give you a powerful, integrated environment in which to build Android applications. It extends the capabilites of Eclipse to let you quickly set up new Android projects, create an application UI, debug your applications using the Android SDK tools, and even export signed (or unsigned) APKs in order to distribute your application. In general, developing in Eclipse with ADT is a highly recommended approach and is the fastest way to get started with Android. If you'd like to use ADT for developing Android applications, install it now. Read Installing the ADT Plugin for step-by-step installation instructions, then return here to continue the last step in setting up your Android SDK. If you prefer to work in a different IDE, you do not need to install Eclipse or ADT. Instead, you can directly use the SDK tools to build and debug your application. The Introduction to Android application development outlines the major steps that you need to complete when developing in Eclipse or other IDEs.

STAGE 4. Configure Eclipse 
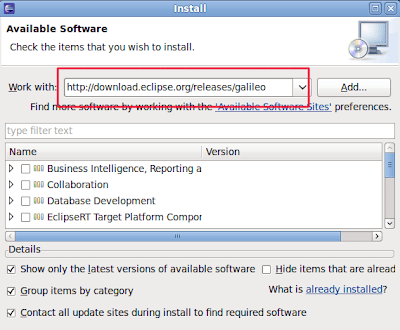
After the installation is complete, open Eclipse (Application -> Programming -> Eclipse)  Then in the menubar, click Help -> Install new software 


after that proceed with  At Work with field enter: http://download.eclipse.org/releases/galileo
Then click Add


Then you will see some software that is available and ready to be installed.
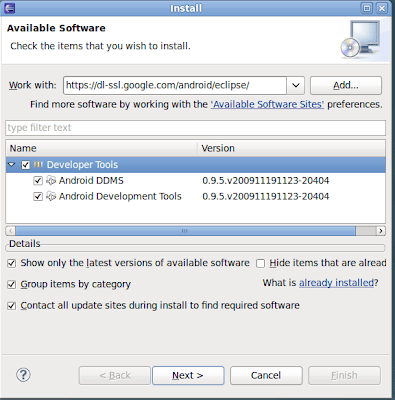
Then, delete the field and replace with Work With https://dl-ssl.google.com/android/eclipse/
Click Add

Select all the entries corresponding to the image, then click Next
After the installation is complete, close your Eclipse, and then run back.
On the menubar select Windows -> Preferences. On the left choose Android.
Enter the path on your Android SDK Location field.
Click Apply and OK

after the above is completed then the process of setting process, to launch the Android project, on the menu bar select File -> New -> Projectlalu select Android Project on the Wizard.

if all the above has been running as they should then android development project can be run

hopefully useful information is still sketchy and when can you add to post comments below
More aboutHow to Installing the Android SDK

Android NDK for Native Development Tools

Posted by BBCyber on Monday, August 2, 2010

Here I will describe an additional application called the Android NDK is a complementary tool to the Android SDK that lets you build in-depth performance of an application in native code.

Using the original code does not automatically result in increased performance, but always increasing complexity of applications. If you have not run into any limitations with using the Android framework API, you may not need to NDK. for more information about what NDK offers and whether it will be useful for you.
Android NDK for Native Development Tools


The NDK is designed to be used only in conjunction with the Android SDK. If you have not installed and setup the Android SDK, please do so before downloading the NDK.

Windows : android-ndk-r6-windows.zip

Mac OS X (intel) : android-ndk-r6-darwin-x86.tar.bz2

Linux 32/64-bit (x86): android-ndk-r6-linux-x86.tar.bz2
More aboutAndroid NDK for Native Development Tools

How to Install the ADT Plugin for Eclipse

Posted by BBCyber on Sunday, August 1, 2010

Here I will discuss how to install the ADT plugin to Eclipse for the development of android operating system.

Before you can configure or use ADT, you must install the Android SDK starter package, as described in Downloading the SDK Starter Package. Specifically, you need to install a compatible version of the Android SDK Tools and at least one development platform. To simplify ADT setup, we recommend installing the Android SDK prior to installing ADT.
When your Eclipse and Android SDK environments are ready, continue with the ADT installation as described in the steps follow these steps to download the ADT plugin and install it in your Eclipse environment:

1.Start Eclipse, then select Help > Install New Software....
2.Click Add, in the top-right corner.
How to Install the ADT Plugin.png

3.In the Add Repository dialog that appears, enter "ADT Plugin" for the Name and the following URL for the Location: https://dl-ssl.google.com/android/eclipse/

4.Click OK
Note: If you have trouble acquiring the plugin, try using "http" in the Location URL, instead of "https" (https is preferred for security reasons).
How to Install the ADT Plugin for Eclipse

5.In the Available Software dialog, select the checkbox next to Developer Tools and click Next.
How to Install the ADT Plugin for Eclipse Available Software

6.In the next window, you'll see a list of the tools to be downloaded. Click Next.
7.Read and accept the license agreements, then click Finish.
How to Install the ADT Plugin for Eclipse Install Details
How to Install the ADT Plugin for Eclipse Review Licenses

Note: If you get a security warning saying that the authenticity or validity of the software can't be established, click OK.
How to Install the ADT Plugin for Eclipse Security Warning

8.When the installation completes, restart Eclipse.
How to Install the ADT Plugin for Eclipse restart

Once you’ve successfully downloaded ADT as described above, the next step is to modify your ADT preferences in Eclipse to point to the Android SDK directory.
Go to Menu / Eclipse / Preferences
How to Install the ADT Plugin for Eclipse Eclipse Preferences.png

Select Android in the left panel.
For the SDK Location in the main panel, click Browse… and locate your downloaded SDK directory.

How to Install the ADT Plugin for Eclipse Android SDK Location
Click Apply, then OK.
More aboutHow to Install the ADT Plugin for Eclipse

Android Development Tools (ADT) is a plugin for the Eclipse

Posted by BBCyber on Wednesday, July 28, 2010

Android development in need of additional tools in the Android development tools (ADT) is the designation of plugins for Eclipse. With this system you are in possible to update the ADT plugin in your development tool.
Android Development Tools (ADT) is a plugin for the Eclipse IDE that is designed to give you the environment, a powerful integrated on where to build Android applications.
ADT extends the capabilities of Eclipse to quickly set up new development of Android, making the UI application, adding component based on the Android Framework API, debug your applications using the Android SDK tools, and even export is signed (or unsigned). APK file in order to distribute your application.
Android Development Tools (ADT) is a plugin for Eclipse is recommended and is the fastest way to start the setup project was guided supply, as well as tool integration, a custom XML editor, and debug ouput panel.
This document provides step-by-step instructions on how to download and install the ADT plugin into your Eclipse development environment. Note that before you can install or use the ADT, you must have a compatible version of the Eclipse IDE and Android SDK installed.
If you are using ADT, this document also provides instructions on how to update the ADT to the latest version or how to uninstall, if necessary.

Android Development Tools (ADT) is a plugin for the Eclipse


Download to install or update Eclipse
Download the current ADT plugin zip files from the table below (do not unpack it).

if there are things that need to be added or a complete lack of this material may be added in post a comment below!

hopefully useful information
More aboutAndroid Development Tools (ADT) is a plugin for the Eclipse

Android SDK Starter Package

Posted by BBCyber on Friday, July 23, 2010

Currently based Android operating system began to grow every year, until the android operating system start-loved by its users around the world, if you want to try to change the system to the android operting there are currently three operating systems for Windows, Mac OS X (Intel) and Linux.

you can get the operating system, Android SDK below;
Android SDK Starter Package

Download for windows
- android-sdk_r12-windows.zip
- installer_r12-windows.exe (Recommended)
Download for Mac OS X (Intel)
Download for Linux
More aboutAndroid SDK Starter Package